Pages

Tuesday, December 21, 2010

What are you Giving the Principal for Christmas?

I'm sure probably thinking, "Um, nothing!" I do realize school is over for Winter Break and you were probably doing good to get a gift for the teacher, much less the principal or anyone else at school. When I taught, I got showered with gifts but I felt bad for the director of the preschool because it seemed like she didn't get much when Christmas came around. So when I saw this idea in my December Martha Stewart issue, I figured I could give gifts to those "forgotten" educators (they are definitely deserving of something) and it only cost $1/candy bar. We gave the Santa to Madelin's teacher. The snowmen were distributed among the principal, coordinator, expressive arts teachers, librarian and counselor. If you click on the Martha Stewart link, you will see that they used yarn instead of ribbon and Madelin and I used black crafters paint for the eyes and mouth as opposed to black ink and I used cream felt for the beard and the top of the Santa hat. The labels are also from Martha Stewart. Maybe you can give it a try next year...

Friday, December 17, 2010

I Hope Your Christmas is a Sweet One!

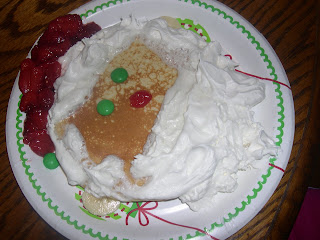
A week or two ago the Schwan's lady (yes, lady!) brought a catalog to our door. I was flipping through, not looking to purchase, just drooling over the yummy pictures (and found this yummy Santa)! ;) Pancake face, whipped cream beard and hair, strawberry hat, m&m eyes, cherry nose and banana ears make for one good looking Santa!
Santa is getting chocolate covered pretzels at our house. As Madelin informed me, "You know Santa only likes cookies!" Oh well, these are just as tasty and cause me alot less stress!!!
Now that's my kind of reindeer food.
Christmas m&m's, raisins, marshmallows, peanuts and chocolate chips. You're welcome, Rudolph!
Gingerbread kit from Trader Joe's. Madelin enjoyed decorating it and Anders enjoying sneaking the m&m's off of it. If you like the taste of sweet cardboard, it's for you. ;) No really, it was fun to do.

Wednesday, December 15, 2010

Santa's Going to Have to Bring Stocking Stuffers This Year

For many years, I've wanted to make stockings! I saw these stockings a few years ago in a Garnet Hill catalog (I cut-out the page for ideas) and have always adored these stockings from Pottery Barn Kids. But I never wanted to buy them when I knew that I could make them. Now, that I stay home full-time and know how to use my sewing machine, I finally found the time to make them!The Garnet Hill stockings are made of felt, so I thought that would be easy enough. As you can see from the high quality (or not) photo I bought green, brown, red and white felt from Hobby Lobby. I can't remember how much (perhaps a yard or so) I bought but let's just say it was more than enough because I still have some left over.
Please focus on the stocking "pattern," not the sweet sponge painted block walls (yes, this is my basement-don't judge ;)). Chris helped me make the stocking pattern, we used cardboard and the measurements (11x20) from the Pottery Barn Kids stockings (plus, 4 1/2 inches for the cuff).
I cut 2 stocking pieces from each color of felt and then pinned the matching pieces together. The white piece of paper has an initial on it (C, K, M or A).
These are all of the pieces that I cut out; some from a pattern but mostly free-handed. I used crafter's glue to adhere the felt.
I created the initials by typing each letter, printed "C," "K," "M" and "A" out, pinned the paper initial to the felt and then I cut around the paper intial.
I got the bear idea from a Mini Boden shirt and the paw prints were my idea; I also added floss for the mouth.
The snowman was created using snowman stocking ideas from P.B.K., Garnet Hill and my own creativity; I also used floss on the scarf and real buttons for the buttons.
The ornaments are similar to the Garnet Hill ones and again, my own creativity.
I used pinking shears to cut-out the pine trees, similar to the Garnet Hill pine trees.
The other various colors of felt are from felt scraps I already had. I hand-sewed ALL of the pieces onto the stockings - it took forever!!!!!!!!!
I pinned all of the pieces to the front stocking pieces.
I folded the front piece of felt down 4 1/4 inches and pinned the initial onto this flap.
After sewing the initial down, I un-pinned the 4 1/4 inch flap and laid it back on top of the back piece.
For the tabs, I cut a total of 8 strips (1 x 6 ). As you can see, the tabs are a double layer of felt (for strength and durability).
On the sewing machine, I sewed (on both sides of the tab) the two strips together .
After, all of the pieces were sewn on and the tabs were made, I sewed the front and back stocking pieces together. From the top of the stocking to 4 1/4 in. down (on both sides of the stocking), I sewed 1/8 in. from the outside; this is to prevent bunching when the top is folded over to create the cuff. From the 4 1/4 in. down, I sewed 3/8 in. in from the outside around to the opposite side of the cuff. I know this is confusing and it's difficult for me to explain but it worked! Once that was done, I hand-sewed the tabs on. It was then that I "saw the light at the end of the tunnel!!!!!"
The stockings are hung and just in time for Santa to bring lots of little treasures!

Thursday, December 9, 2010

Say "Cheese"

I've been working hard on making our Christmas stockings and hope to have them done within the next few days, so until then I don't have any crafts or decorating ideas to post. I thought it would be fun to post some photos from our recent family photo session. We were lucky enough to have a few good ones to chose from for our Christmas card. And then there were some that just made me laugh or smile (you know, the photos that truly portray what really happens at those photo sessions). Enjoy!! Madelin posing on the slightly-too-small rocking horse; she HAD to pose on it.
This just screams, "DISASTER!!!!" Luckily, all ended well! :)
We thought "Buddy" could "help" Anders smile and cooperate. Wishful thinking!
One of my favorites of the "Hansen duo."
And then there's this one! I think to myself, "Is this photo session really that horrible, Anders?"
I enjoy this one, too. That little boy ADORES his sister.
This sums it all up...Anders was not enjoying being photographed (if that wasn't already obvious). And then there's Madelin who loved the spotlight! You've got to love it! :)

Monday, December 6, 2010

What Do You Do With All of Those Cards??

We love to receive Christmas cards at our house. Every year, we seem to get a few more than the year before and finding the space for them can be tricky. I was flipping through a Pottery Barn Kids catalog and came upon a page that showed Christmas cards hanging from some kind of string. I thought to myself, "I can do that...for cheap!" I nailed a nail in the wall, tied twine around the nail and then nailed the nail in completely. I did the same on the opposite wall. The twine is about 16 ft. long. We have received one card, thanks Laura. :) I used a binder clip (purchased at Office Max) to hang the card on the twine.

I used to place and hang the cards on the mantle, but as you can tell, it has been over-taken.
I also used to tape them above the archway between our entryway and dining room but I wanted to try something new.
What do you do with all of your fabulous Christmas cards?

Thursday, December 2, 2010

Inexpensive Chandelier Decor

We have this light fixture (I hate to call it a chandelier, that sounds so fancy and ours is nice but not fancy!) that begs to be decorated! I looked in Pottery Barn for ideas, but no such luck. I was at Target with a few friends last week and one of the friends showed us these ornaments. I remembered the ornaments and had to go back and buy them!! They were $1 per set of ornaments; in the $1 bins.
I used clear fishing line to tie them to the light fixture. The tying process took a little while but it was a cheap and easy decoration, you can't beat it!

Thanks for stopping by!